前段时间没忍住剁手,捐入了某不可说的PT。手里有一台RS2000美东和一台RS1000维也纳,都是翻倍硬盘的,维也纳本来是已经cancel了,想着先把4个月会员刷完,就又取消掉cancel了。废话不多说,下面直接开始刷流的教程。
1. 安装qbittorrent-nox
qbittorrent的版本见仁见智,新的版本已经迭代到5.0以上了,不过部分PT站不支持最新的版本需要注意。这里我使用的是qbittorrent4.3.9-libtorrent1.2.19,因为个人使用感觉来看,4.3.9版本是最稳的,其他版本安装方式一样。
这里选择机器对应架构的版本下载到服务器,以x86_64为例,我一般放在/usr/local/bin下,然后重命名文件并加上执行权限。
# 重命名
mv x86_64-qbittorrent-nox qbittorrent-nox
# 增加执行权限
chmod a+x qbittorrent-nox
在配置服务之前,我们先手动执行一下,因为第一次执行会有一个确认的步骤,在服务器执行一下命令。
# 后面的--profile参数是指定配置文件的路径,可以根据你自己的需要调整
/usr/local/bin/qbittorrent-nox --profile=/usr/local/etc执行后会出现一个等待输入的框,我们输入字母y,然后回车即可,然后命令行就会显示web的登录地址(默认是http://ip:8080),以及默认的账号admin和密码adminadmin。到这里初始化就完成了,我们按ctrl+c取消服务。
下一步我们来配置系统服务和开机启动,按步骤执行如下指令。
# 编辑/创建文件
vim /etc/systemd/system/qbittorrent-nox.service

# 将下面内容写入上面的文件,:wq保存退出
[Unit]
Description=qBittorrent Command Line Client
After=network.target
[Service]
Type=exec
User=root
ExecStart=/usr/local/bin/qbittorrent-nox --profile=/usr/local/etc
Restart=always
[Install]
WantedBy=multi-user.target

# 重新载入配置并设置开机自启
systemctl daemon-reload
systemctl enable qbittorrent-nox.service

# 启动
systemctl start qbittorrent-nox

# 停止
systemctl stop qbittorrent-nox

# 重启
systemctl restart qbittorrent-nox

# 查看状态
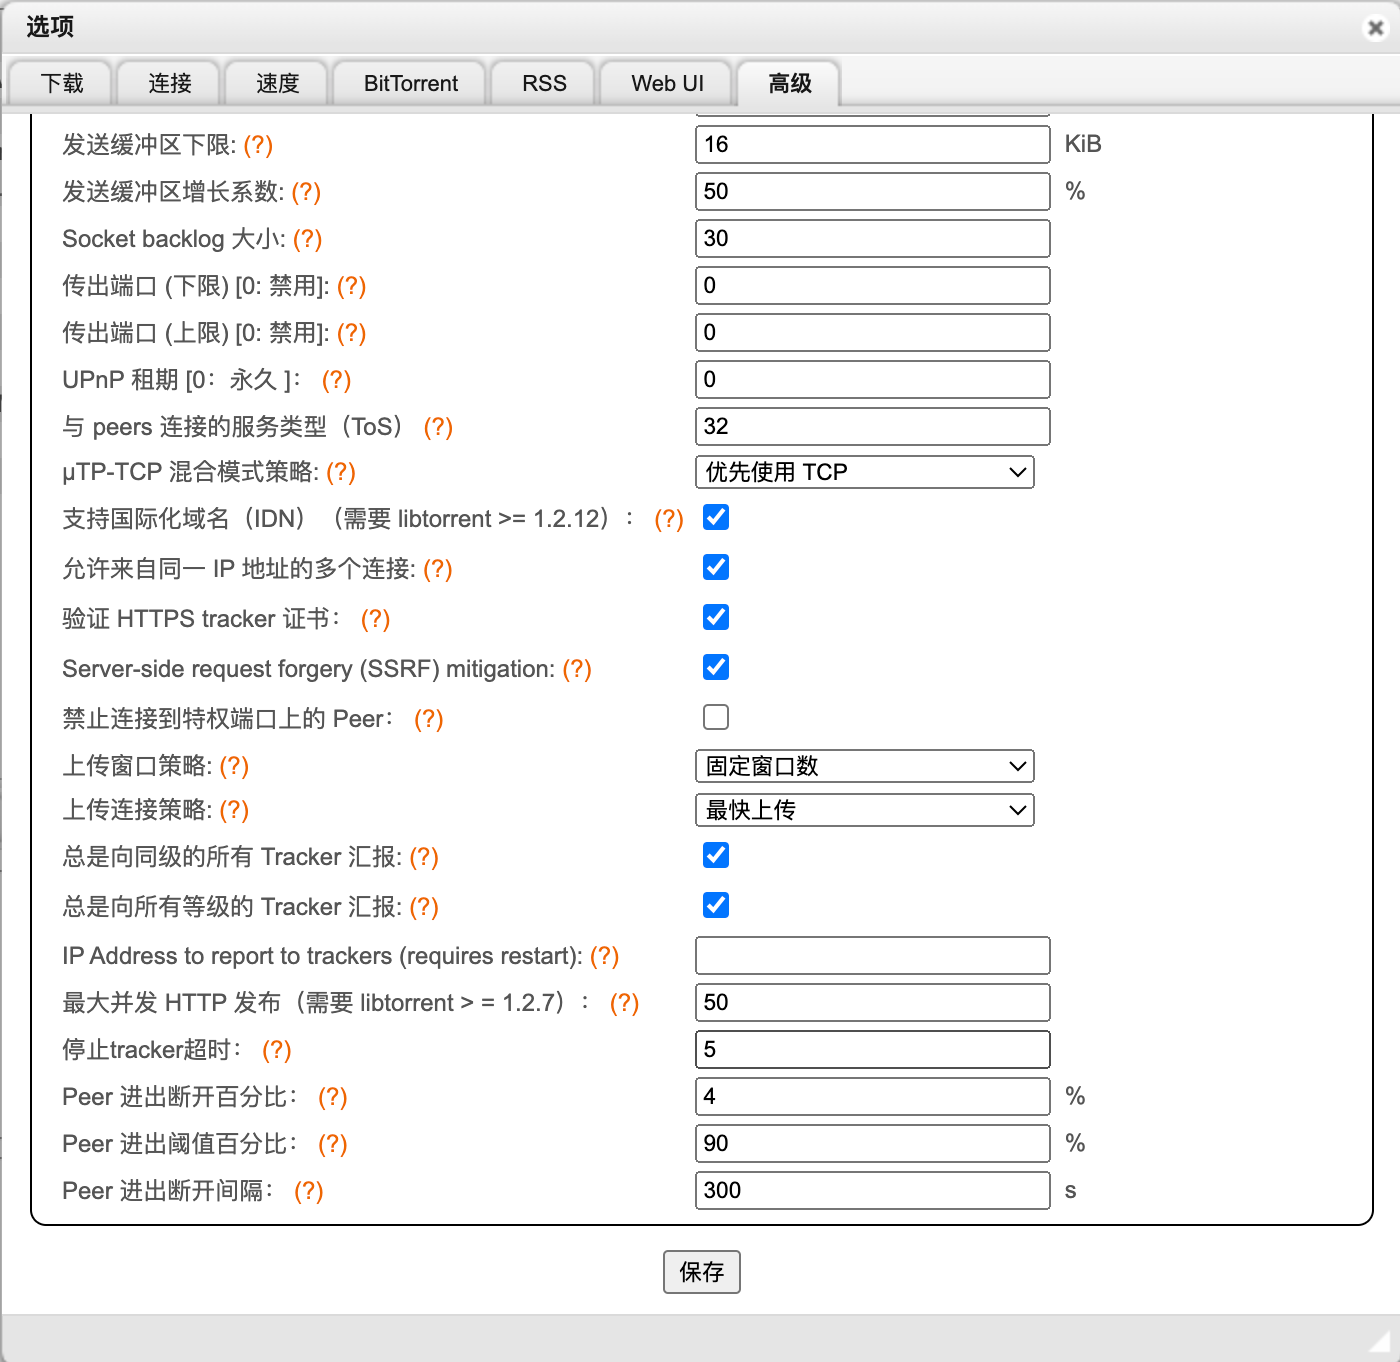
systemctl status qbittorrent-nox到这里qbittorrent-nox的安装就完成了,我们通过http://ip:8080访问,即可看到qbittorrent的web页面了,输入默认账号密码登录,一些基本的配置修改我就不再说了,网上一堆教程,这里贴一下高级里面设置的截图,供大家参考。

2. VERTEX安装
VERTEX直接通过docker安装即可,方便简单,具体可以查看wiki。
# 先创建映射的目录
mkdir -p /data/vertex

# 通过docker安装
docker run -d \
  --name vertex \
  -v /data/vertex:/vertex \
  -p 3000:3000 \
  -e TZ=Asia/Shanghai \
  --restart always \
lswl/vertex:stable服务默认端口为3000,我们通过http://ip:3000访问。
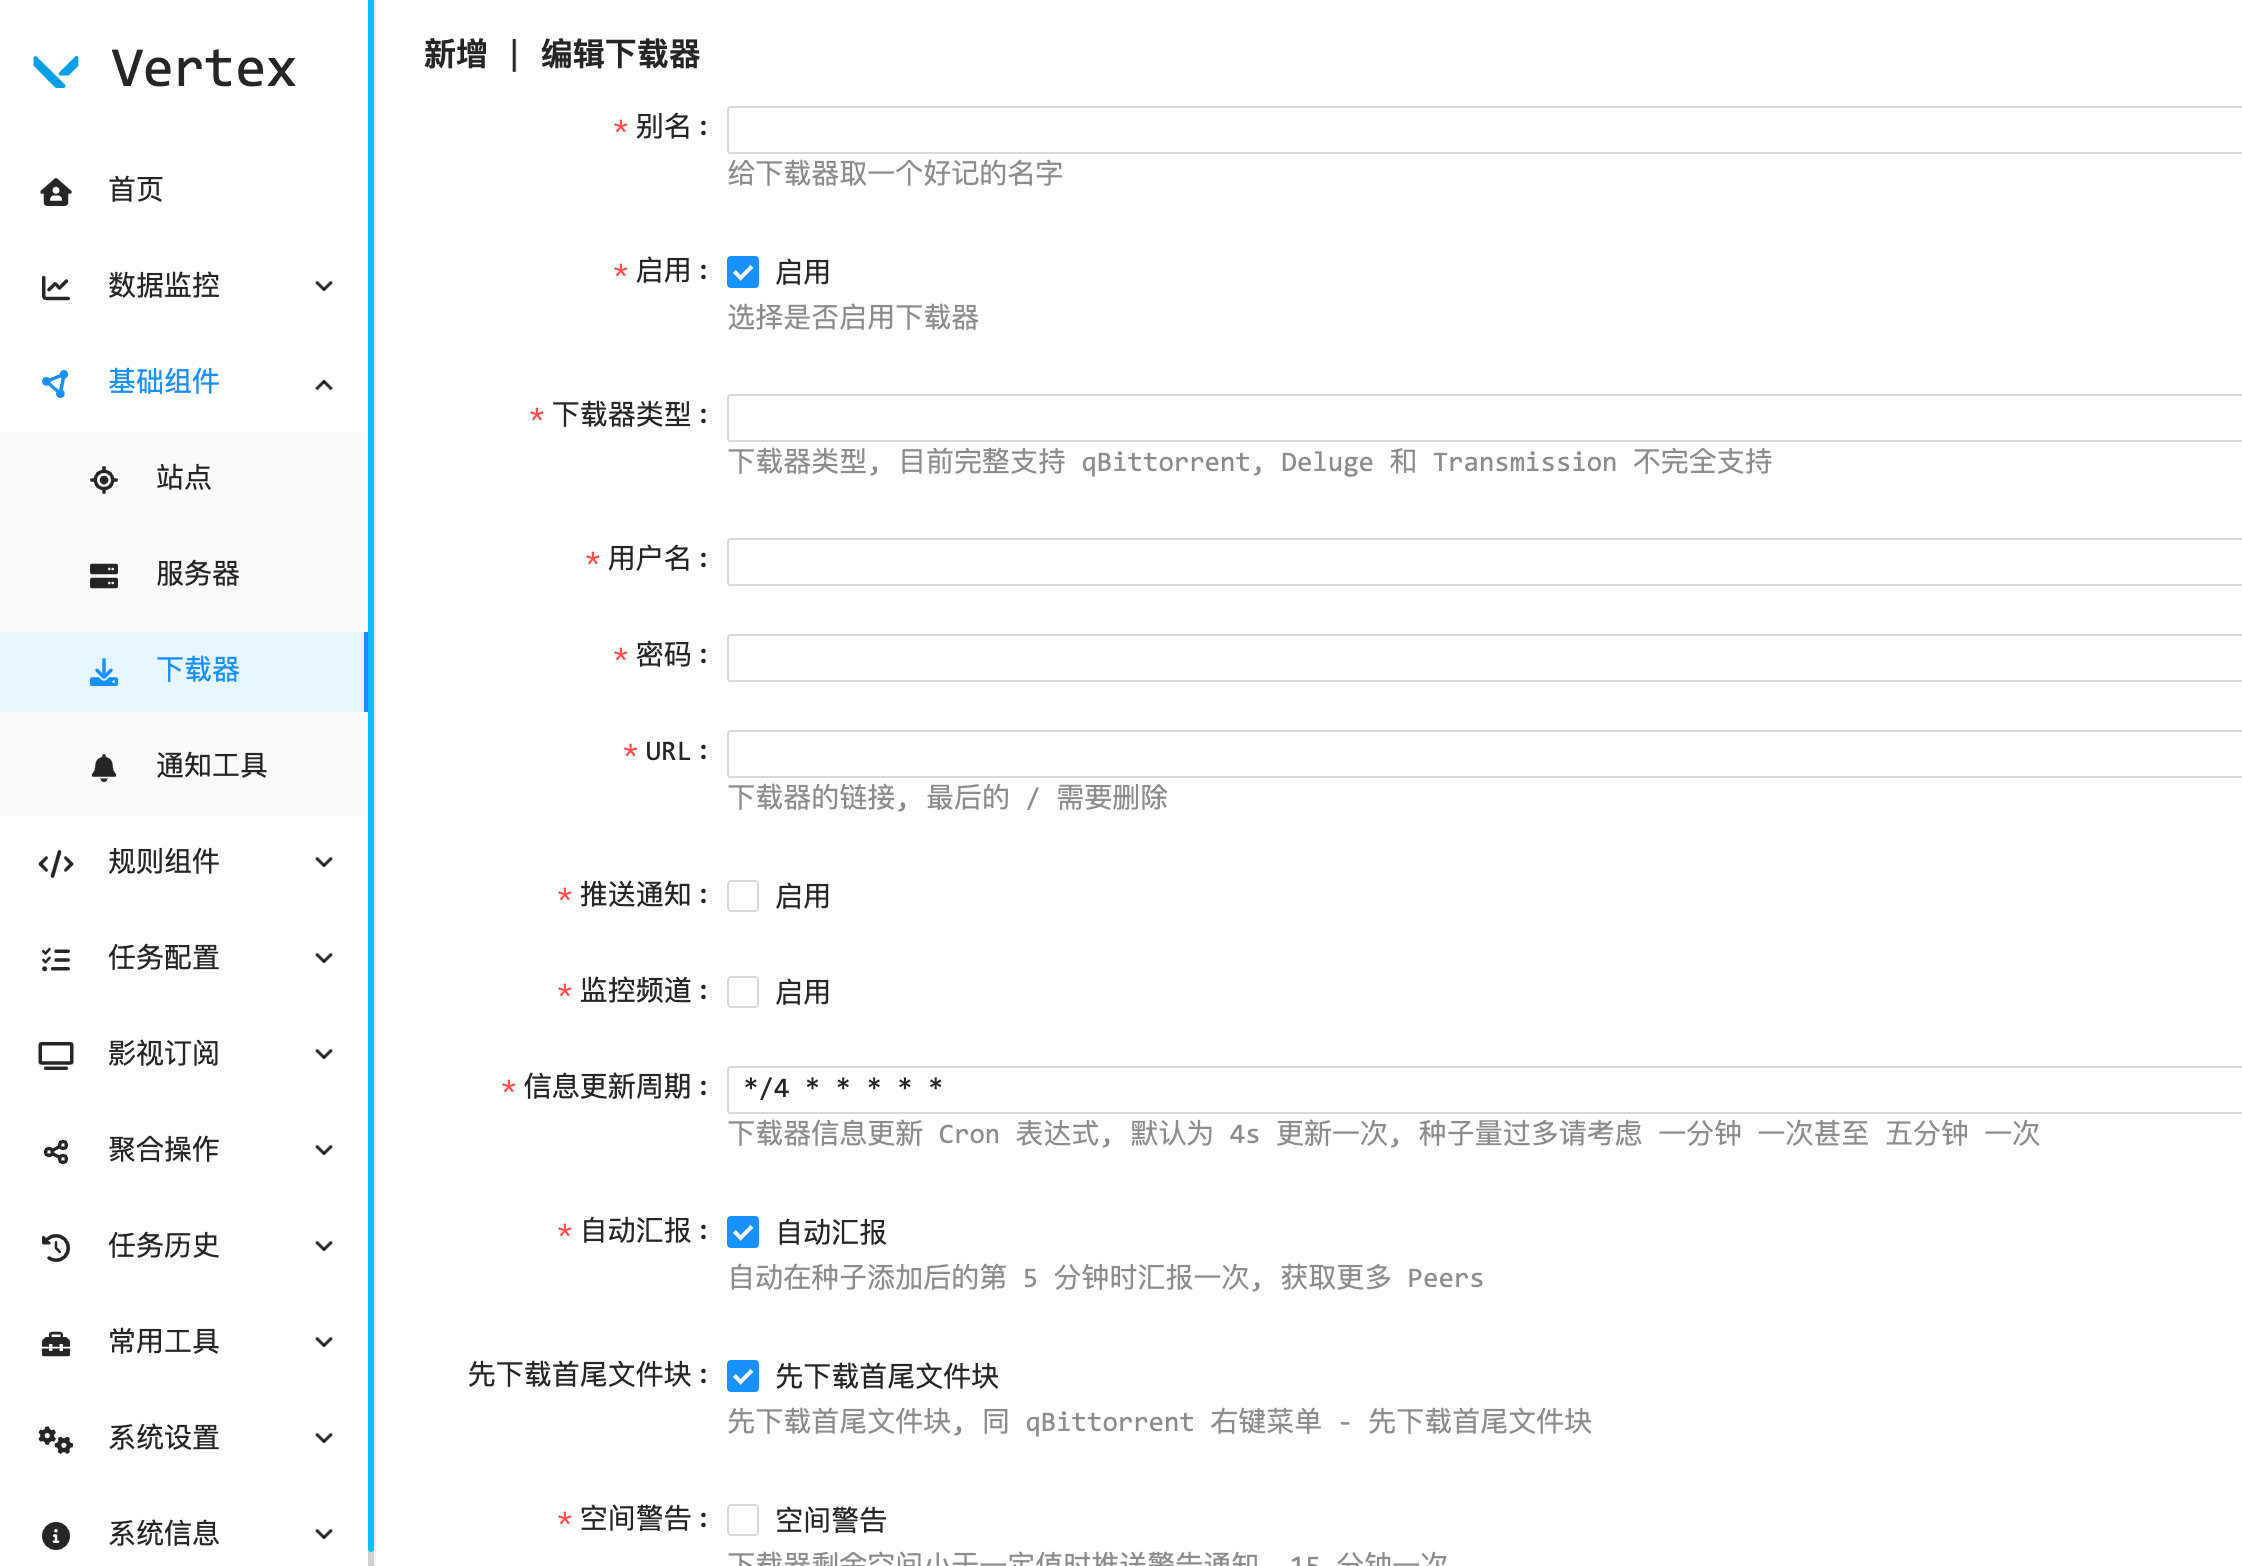
2.1 创建下载器
 按需填入配置,如果有多台机器,在每台机器上安装qbittorrent-nox,然后这里添加多个下载器。
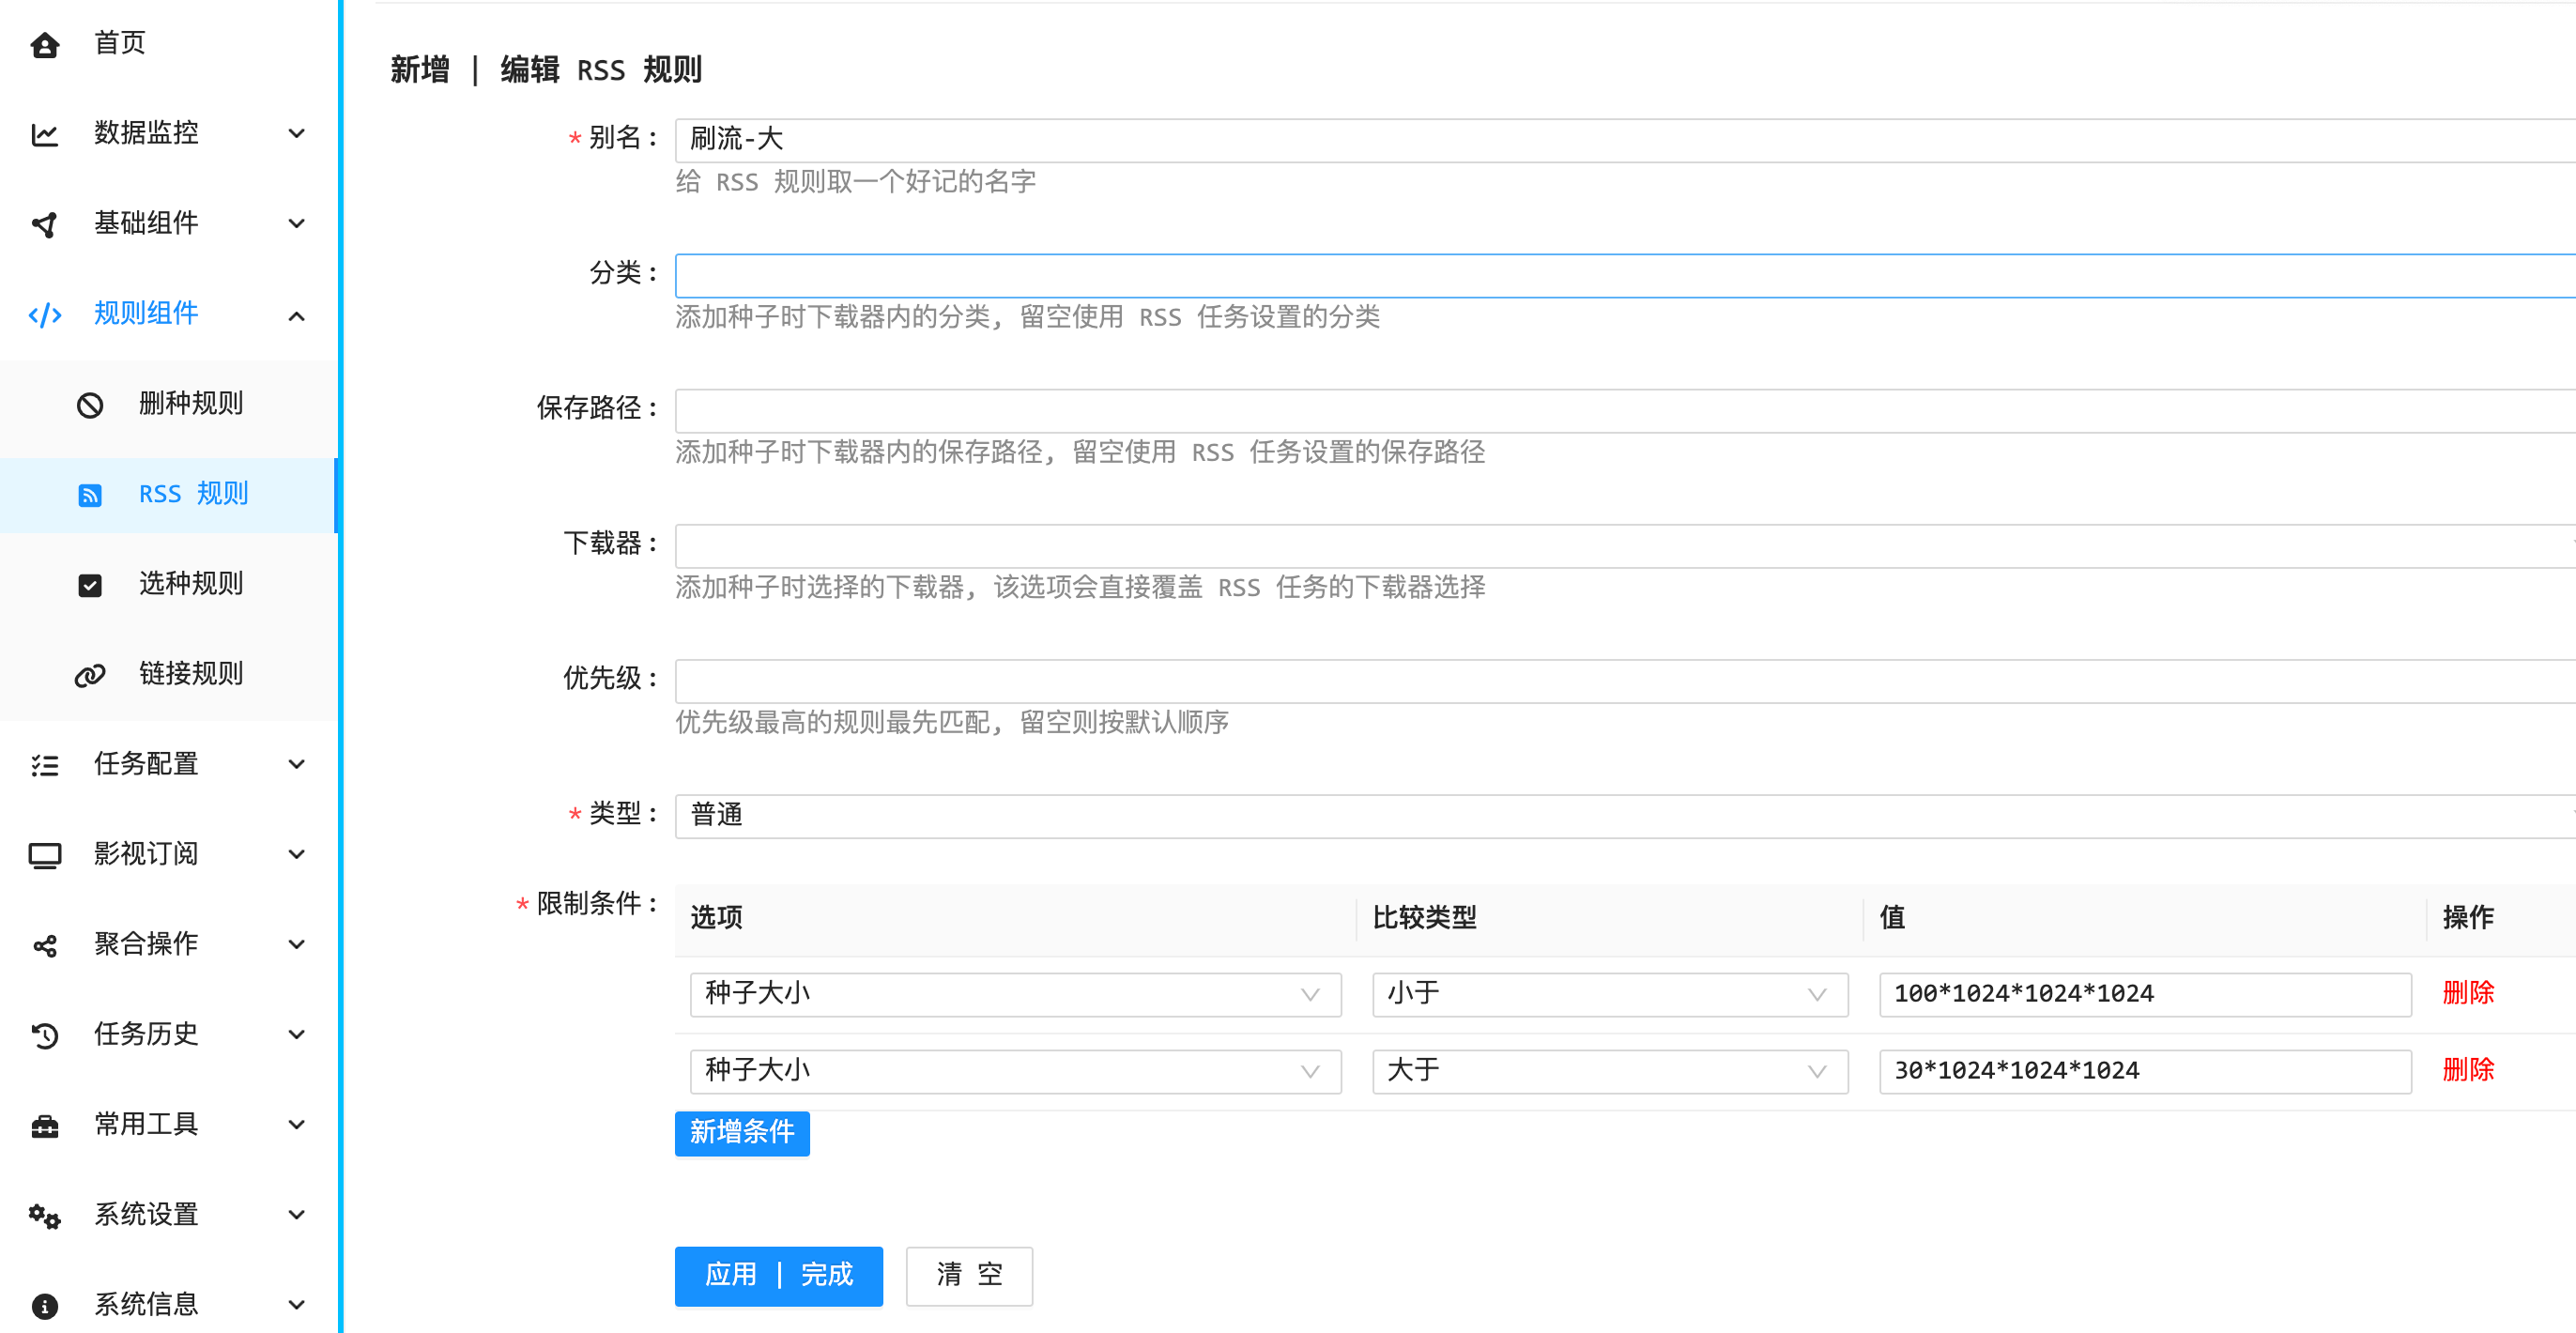
2.2 创建RSS规则
 这里我的RSS选种规则是种子大小大于30G且小于100G,只有在这个范围内的才会下载,其他的都会过滤掉。需要注意的是RSS刷流任务对应的是RSS规则,下面的选种规则不适用RSS任务。
2.3 创建删种规则
下面是我这边使用的删种规则(参考文章),供大家参考。
a. 慢车
(maindata, torrent) => {
    const categoryList = ["mt-flow", "ad-flow"];
    const stateList = ["downloading", "stalledDL"];
    const { state, category, progress, addedTime, uploadSpeed } = torrent;

    if (categoryList.includes(category) == false) {
        return false;
    }

    if (
        stateList.includes(state) &&
        progress <= 0.05 &&
        uploadSpeed <= util.calSize(250, "KiB") &&
        moment().unix() - addedTime >= 5400
    ) {
        return true;
    }

    return false;
};
b. 分享率(馒头)
(maindata, torrent) => {
    const categoryList = ["mt-flow"];
    const stateList = ["uploading", "stalledUP"];
    const { state, uploaded, size, category } = torrent;
    if (categoryList.includes(category) == false) {
        return false;
    }
    if(stateList.includes(state) && uploaded / size >= 3) {
        return true;
    }
    return false;
};
c. 最长下载时间
(maindata, torrent) => {
    const categoryList = ["mt-flow", "ad-flow"];
    const stateList = ["downloading", "stalledDL"];
    const { state, addedTime, category, uploadSpeed } = torrent;

    if (categoryList.includes(category) == false) {
        return false;
    }

    if (
        stateList.includes(state) &&
        moment().unix() - addedTime >= 43200 &&
        uploadSpeed <= util.calSize(5, "MiB")
    ) {
        return true;
    }

    return false;
};
d. 无效做种
(maindata, torrent) => {
    const categoryList = ["mt-flow", "ad-flow"];
    const stateList = ["uploading", "stalledUP"];
    const { state, uploadSpeed, category, completedTime } = torrent;

    if (categoryList.includes(category) == false) {
        return false;
    }

    if (
        stateList.includes(state) &&
        uploadSpeed <= util.calSize(512, "KiB") &&
        moment().unix() - completedTime >= 3600
    ) {
        return true;
    }

    return false;
};
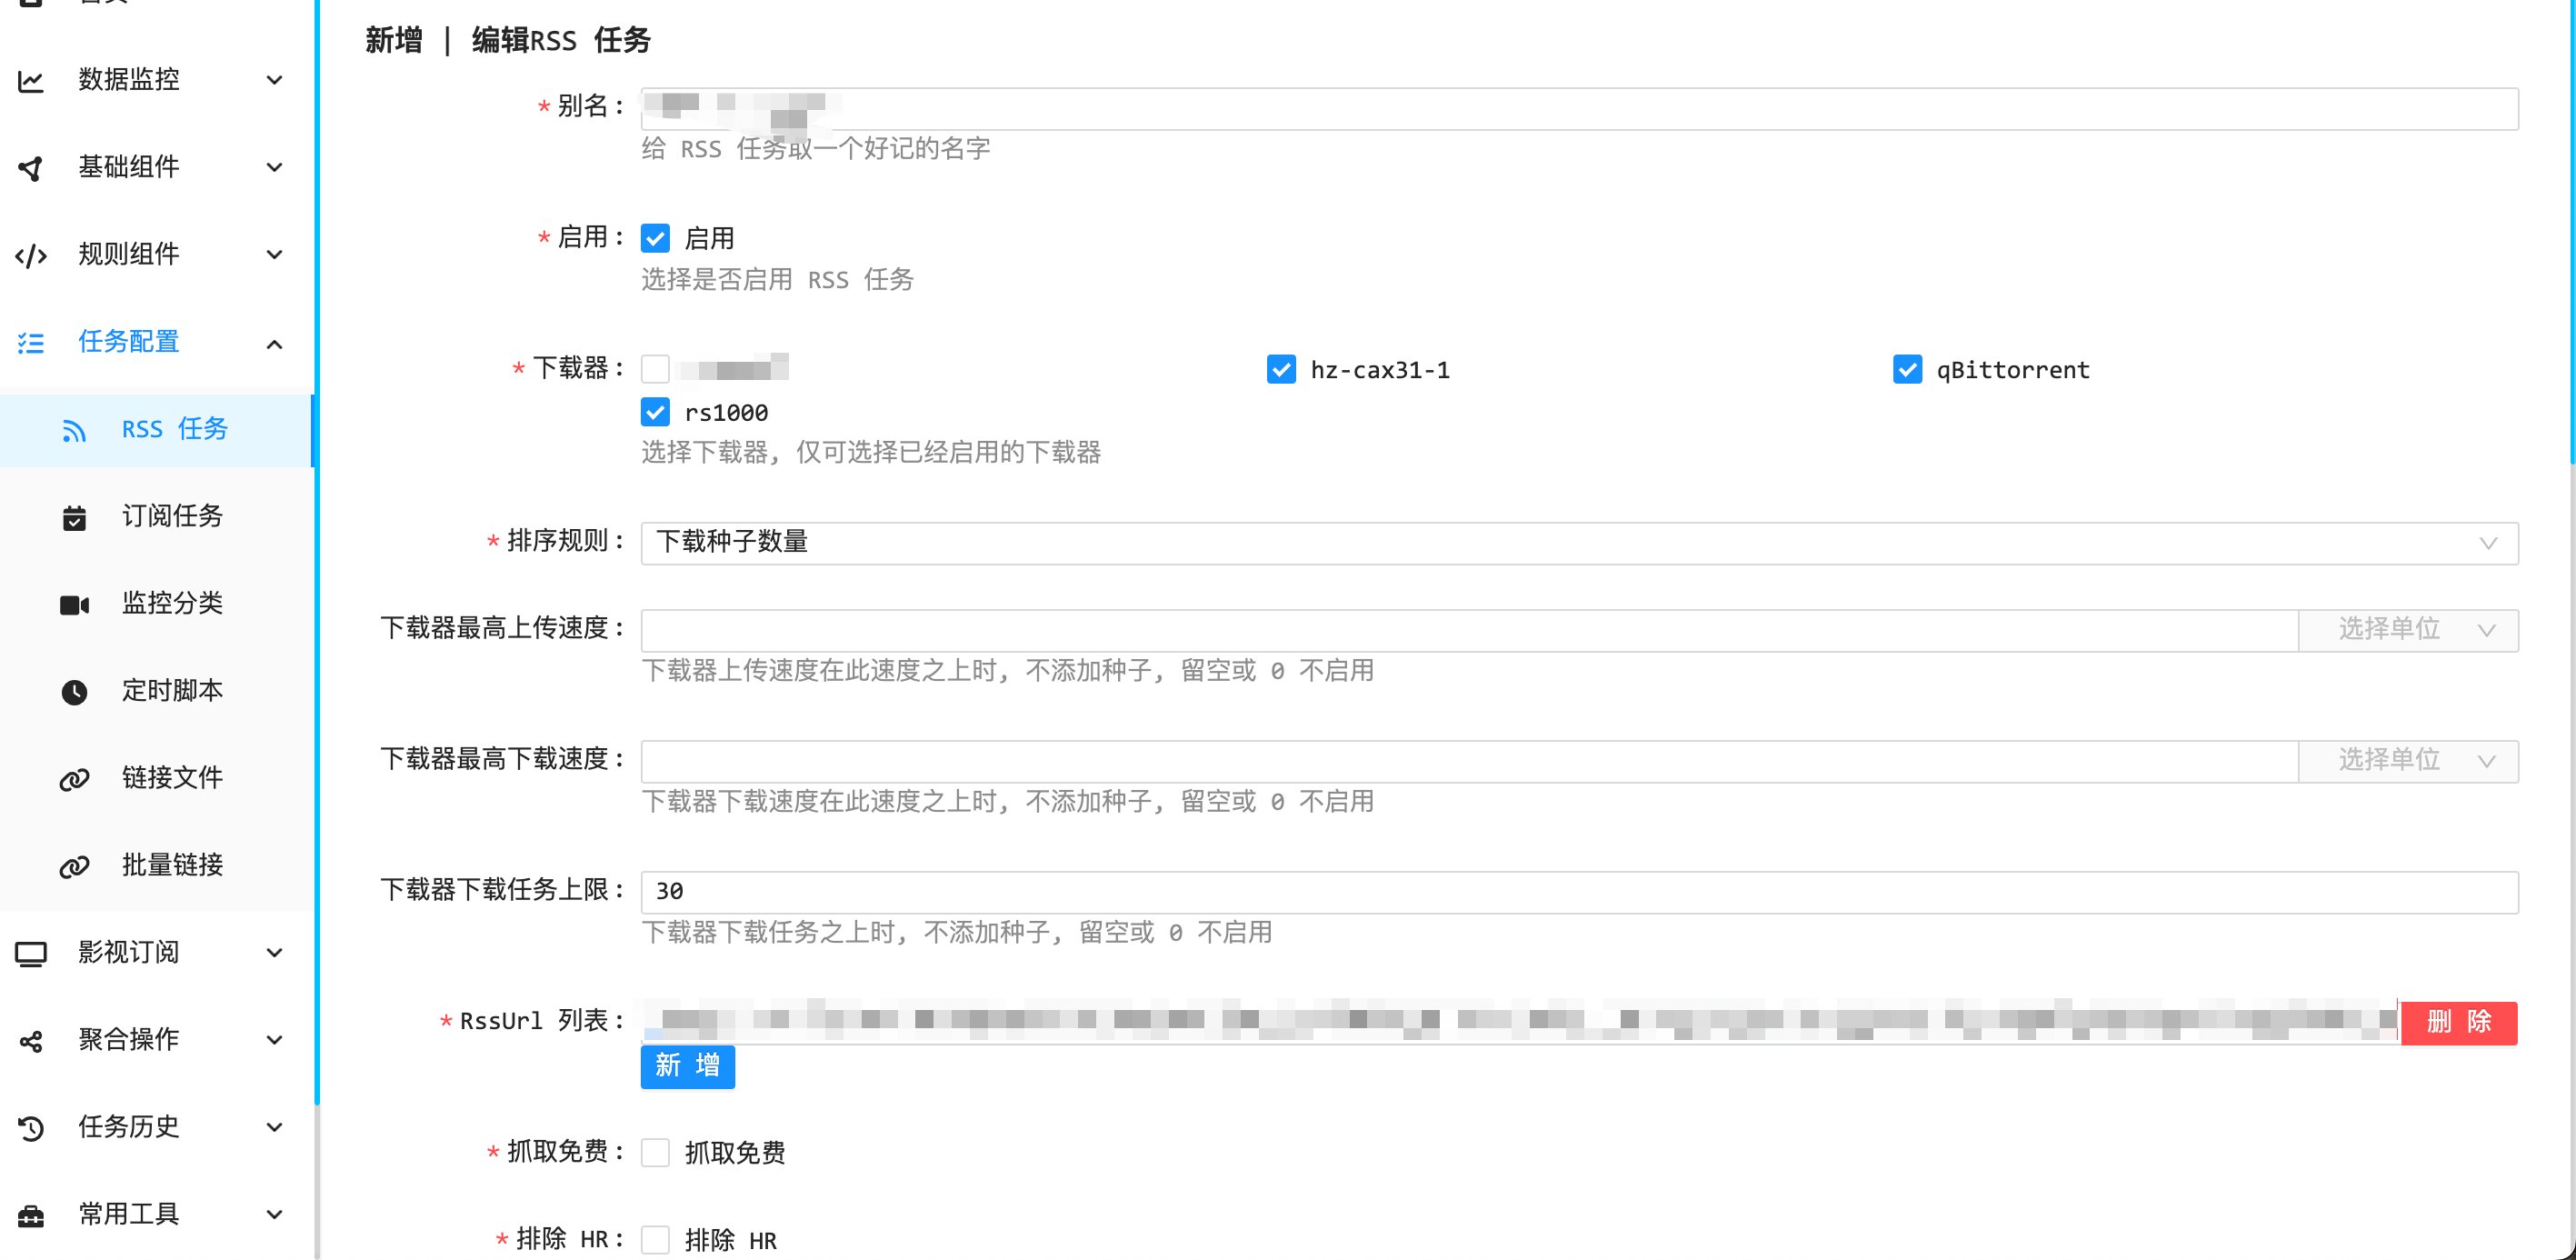
2.4 创建RSS任务

 在
在RssUrl 列表中填入PT站获取的RSS链接,选择规则勾选上我们上面创建的规则。
完成上面的设置,我们就可以开始愉快的刷流了。VERTEX详细的说明和操作教程,可以查看官方wiki。
3. 需要注意的点
不同的站点的限盒规则不同,比如馒头现在已经没办法跟以前一样拆包刷了,最好的解决方法就是开v吧,各大站点的刷法和规则可以参考这个。
发文的当天,我嫌弃NC的两台RS刷的太慢,又开了个HZ的cax31,然而硬盘有点小,刷的有点憋屈。因为NC的两台RS都是G11的,存在每天3T高速流量后限速300M的限速策略,所以如果想要爽快的刷流,可以去收G9.5每月120T高速流量的RS,等毕业再出掉就好了。